

If you're thinking about listing your products on Amazon,
"How to Register an Account for Listing Items" and
Listing methods such as “Joint Listing” and “New Listing,” etc.
Do you know how to register a product?
This article provides a detailed, illustrated guide on how to register products and create a seller account.
Let's deepen our understanding of selling on Amazon.
Must-Know! What Should You Decide Before Registering a Product?
When you start selling on Amazon,
Did you know that you need to decide in advance whether to list your items as a “bulk seller” or a “small-scale seller”?
Bulk listings and small-volume listings each have their own characteristics.
Let's start by figuring out which option is more appropriate for you.
If you meet the following criteria, please select the appropriate listing type.
Wholesale Listings
- We expect to sell more than 50 units per month.
- I would like to review and analyze various business reports.
- I want to set the shipping fees and delivery date and time.
- I want to use Advertising and Marketplace Prime.
Small-Lot Listings
- Sales are projected to be 49 or fewer per month.
- I'd like to try listing items on Amazon.
If you'd like to learn more, please refer to the article below.
After comparing the two, it’s a good idea to decide in advance whether to opt for bulk listing or small-lot listing.
What should I do to prepare before listing an item?
To ensure a smooth listing process on Amazon, there are a few things you should prepare in advance.
First, let's create two accounts: a "buyer account" and a "seller account."
The buyer account and the seller account are completely separate.
By creating a buyer account first, you can then create a seller account.
By the way, if you already have a purchase account, you don't need to create a new one.
Now, I'll walk you through how to create each account, complete with screenshots!
How to Create a Purchase Account
Steps to Create a Purchase Account
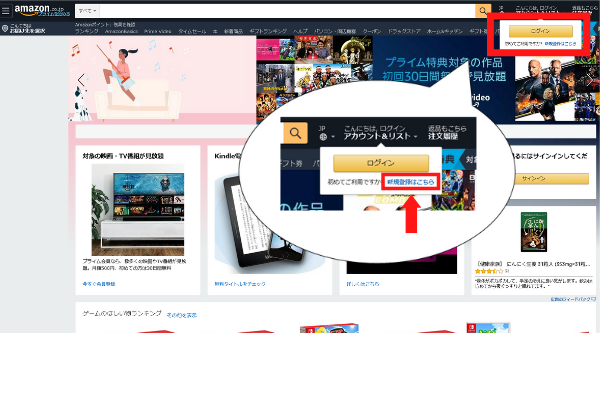
1. Open the Amazon homepage.
The upper-right section outlined in red
[Click here to sign up]Click here.
By the way, if you already have a purchase account,[Log In]You can log in by clicking the button.
2. Enter the required information.
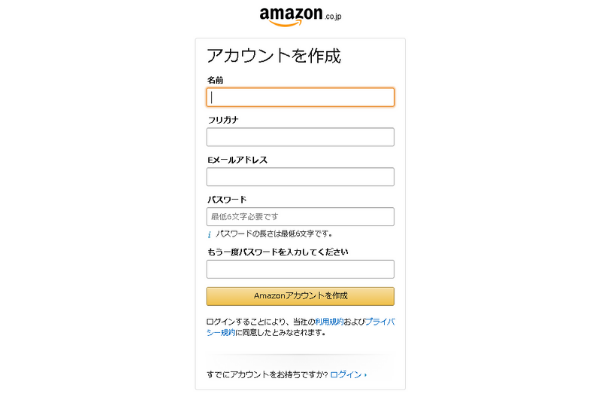
The email address you enter here will be used for the registration that follows.
What is a “Seller Account”?A different email addressLet's just leave it at that.
When an order is placed, a notification is sent to the email address registered for your seller account.
If you use the same account for both buying and selling,
Order confirmation emails may get buried, which could disrupt shipping.
In addition, because it makes it easy to manage income and expenses, etc.,
You should probably register a different email address.
Once you've entered all the fields,
[Create an Amazon Account]Click here.
With these two steps, your purchase account is now registered.
How to Create a Seller Account
First, regarding the creation of a seller account
I'll explain in detail what you need to prepare!
What You'll Need
■Credit Cards
Credit cards are used for identity verification and to pay fees.
If you don't have a credit card, a debit card is fine too.
In addition, the monthly fee for high-volume listings (4,900 yen, excluding tax) is,
In principle, it is supposed to be deducted from sales proceeds, but,
If the sales proceeds are insufficient, the amount will be charged to this credit card.
Be sure to use a credit card that is different from the one you use for personal expenses.
It makes filing your tax return a lot less of a hassle.
It seems that many businesspeople use their company credit cards.
You can change your credit card information at a later time.
■Bank Account
This will be used for identity verification and receiving payments.
Since it makes it easier to understand and manage your income and expenses,
It’s a good idea to keep these separate from your personal items.
You can also change your bank account later.
■Email Address
You'll receive a message from Amazon.
What Is a Purchase Account?Something elseIt's easier to manage if you register them.
■Phone Number
This is used for identity verification and is required during registration.
■Certified Copy of the Registry
This is required when registering as a corporation rather than as a sole proprietor.
■Identification Documents
Please prepare the following two items in advance, as you will need to submit them.
(1) One valid photo ID
You are required to submit either a passport or a driver's license.
The My Number Card, which is a photo ID, is
Please be aware that you cannot use it.
The fact that ID cards include a photo, and
The name must match the information registered in Seller Central,
There are some specific guidelines to keep in mind, such as the file format for submissions.
② One copy of each transaction statement issued within the past 180 days
Credit card statements, online banking transaction statements,
You are required to submit either a bank passbook showing transaction details or a balance certificate.
Screenshots and photos taken cannot be used,
There are several points to note regarding this document, such as the file format for submission, so
Please check the following website.
See “Amazon Seller Services”
https://services.amazon.co.jp/resources/start-selling-guide/account-registration.html?ref=as_jp_soa_startguide_register_link
That concludes the preparations.
Now, I’ll explain how to register a seller account.
Steps to Create a Seller Account
Open the Amazon homepage.
Please log in using the purchase account you just created.
────────────────────────
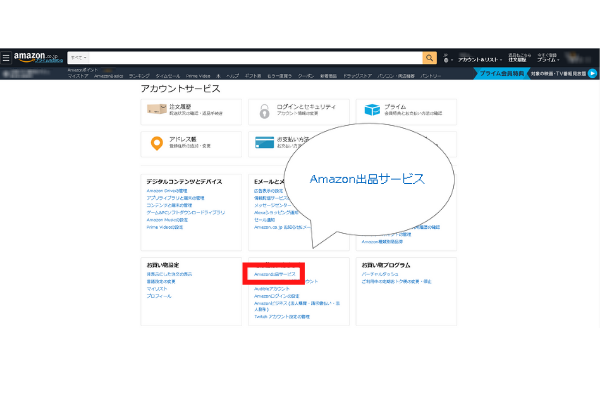
1. Click [Account & Lists] on the Amazon homepage.
It's the part circled in red.
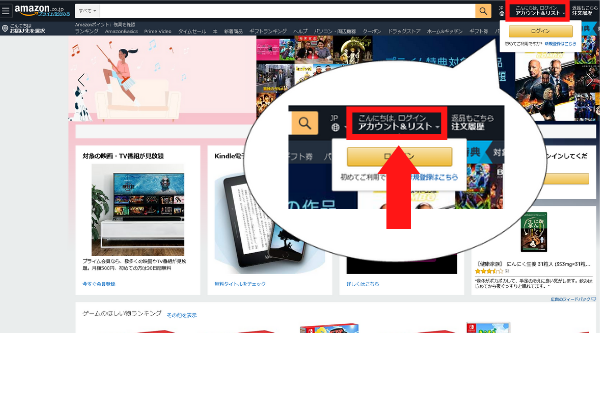
2. Click on the “Amazon Selling Services” section.
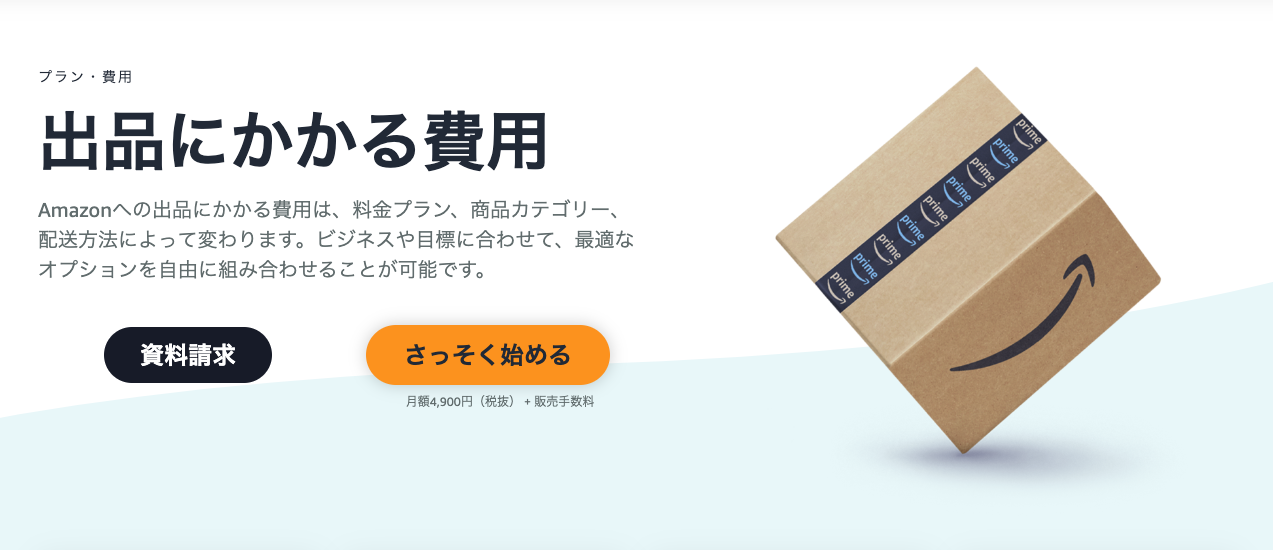
3. Click [Get Started Now], which is circled in red.
Please note that the specifications for this screen may change depending on the time of year.
In this article, we'll explain the "bulk listing" method.
If you are listing small-lot items, you'll find it further down this screen
Please click on the section labeled “Register for Small-Quantity Listings.”
For bulk listings,[Get Started Right Away]Click here.
4. After clicking [Create an Amazon Account],
Enter the required information in the red box on the right.
As explained earlier, the email address is,
What Is a Purchase Account?Something elseIt's a good idea to register it.
Once you've finished entering the data[Next]When you click [], an email will be sent to the email address you registered
Verification Codewill arrive.Please enter that code.

5. Please select or enter the applicable items.
Select the location of your business and enter your name.

Once you've finished entering the information,[Agree and Continue]Click here.
Now, let me explain the remaining input fields.
────────────────────────
1. Business Information
If you selected "Corporation" as the business type on the previous screen,
Please enter the corporate information exactly as it appears in the certified copy of the corporate registry.
The phone number does not have to be the one on file; a personal number that can be verified is acceptable.
Please enter the name of the person being verified.

2. Seller Information
Please enter the relevant information.

3. Marketplace
A marketplace is a place where people buy and sell goods online.
Simply put, it refers to the country where the product is sold.
You can choose where to sell your products from the following options: “North America,” “Japan,” or “Europe.”

4. Claims
Please enter your credit card information.
The monthly subscription fee will be charged to the credit card you registered here.

5. Store
A "store" refers to the name of a shop.
Please enter the store name to be displayed there.
UPC (Uniform Product Code), EAN (European Article Number), and JAN (Japanese Article Number) codes are the barcodes found on products.
The JAN code is used as Japan's standard product code and consists of 13 digits.
Internationally, these are referred to as EAN and UPC.
By the way, EAN is used in Europe and other countries, while UPC is used in the United States.

6. Authentication
Upload the identity verification documents you prepared in advance.

That concludes the instructions for creating a seller account.
The results of the review areAbout 2 business daysYou'll receive a message.
Once you've created your seller account, it's time to list your products!
Points to Note
There is one point to note here.
There is no step in the account creation process where you are asked to enter the bank account you initially set up.
Once your account is set up, you'll need to register yourself.
Be sure to enter the account information for the account where you want the sales proceeds to be deposited.
Put It into Practice Right Away! There Are Two Ways to List Products! A Thorough Explanation of Each
Once you've created your buyer and seller accounts, let's move on to listing your products.
In this post, I’ll explain how to list items using the “Wholesale Listing” option.
There are two ways to register a product.
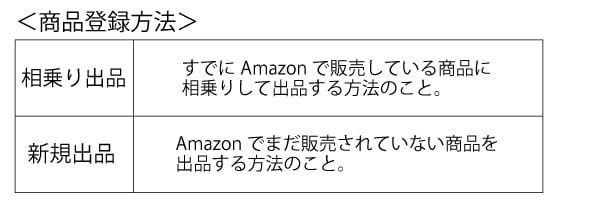
Now, I’ll explain each registration method.
How to Register for a Shared Listing
Listing as a co-seller is a method of listing a product by piggybacking on a product already being sold on Amazon, so,
You can list your item right away.
So, what do you need to prepare in order to list a shared listing?
What You'll Need
・Product code for the item you are listing
If you search using product codes such as UPC, EAN, JAN, or ISBN (International Standard Book Number),
This will give you more accurate results.
It’s a good idea to have the product code on hand so you can find the product page right away.
Procedure
Log in to Seller Central using your listing account.
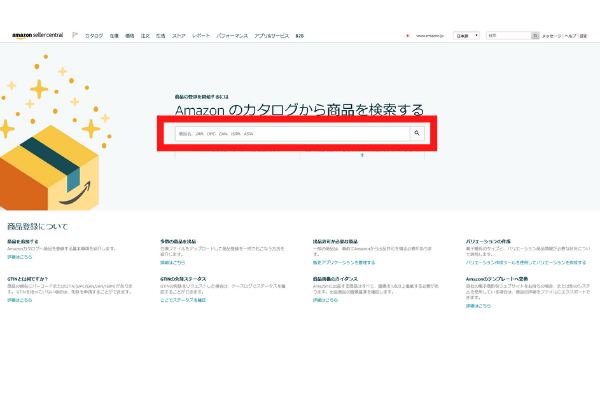
1. At the top of Seller Central,
Click [Catalog] → [Product Registration].
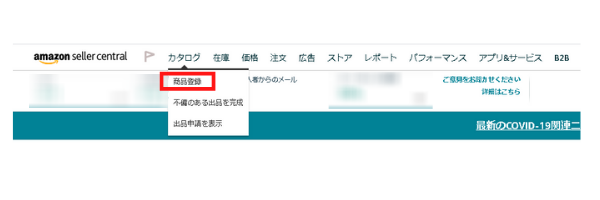
2. Enter the "product code" (such as a JAN code, EAN, or UPC) that you have prepared into the red box shown in the image below.
3. After checking the product images and product information, if they match the item you want to list,
Click the [List This Item] button in the red box on the right.
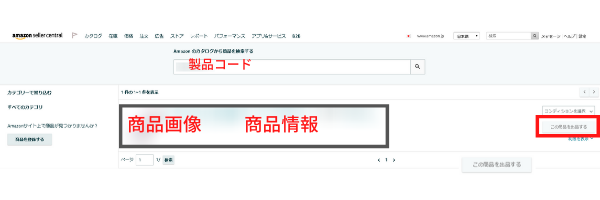
That completes the product listing for a shared listing.
How to Register a New Listing
Listing a new product is the process of listing an item for which a product page has not yet been created on Amazon.
Therefore, we need to create the product pages from scratch.
What You'll Need
The following fields are required, but the required fields may vary depending on the item you are listing.
However, regardless of the product, the following items must always be entered.
────────────────────────
■Important Information
・Product Name
・Product Code
・Brand Name
・Manufacturer Name
■Listing Information
・Price
・Condition
■Image
・Main Image
When listing a product on Amazon, you must upload at least one product image.
Images displayed in search results"Main Image"That's what they say.
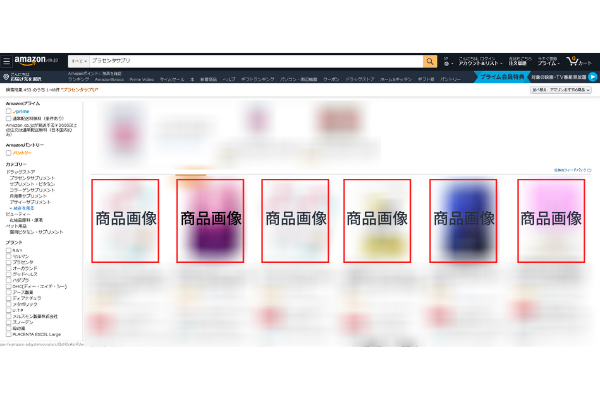
There are guidelines in place that specify the criteria for determining whether an image can be posted.
Please refer to the guide for the [Product Image Requirements (*)] in the yellow section of the website below.
*Available for viewing only on Seller Central.
Reference: Amazon Seller Central
https://sellercentral.amazon.co.jp/gp/help/external/help.html?ie=UTF8&itemID=16881
────────────────────────
These are the things you should prepare in advance.
Depending on the category of the item you're listing, the information you need to provide may vary.
At the very least, make sure you have the items listed above on hand.
Procedure
I'll log in to Seller Central.
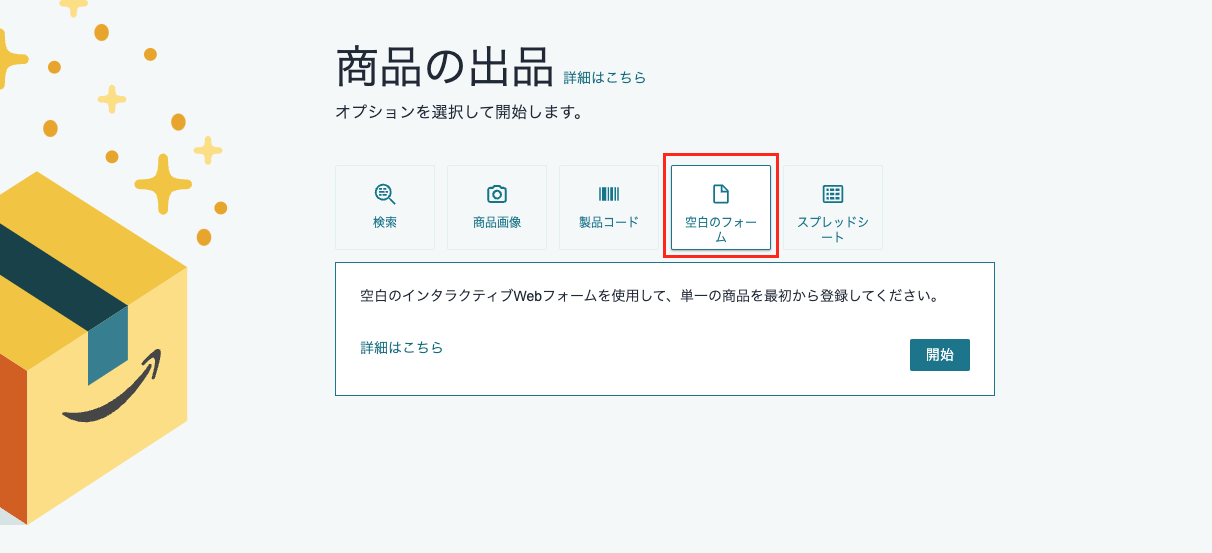
1. Just like when listing a shared listing, open [Catalog] → [Product Registration].
2. From the "List a Product" page, click [Blank Form].
3. Select “Required Fields” and enter the product name and product type.
There are three items in the list.
- ・Required fields
- ・Recommended
- ・All items
Please select the "Required Fields" here.
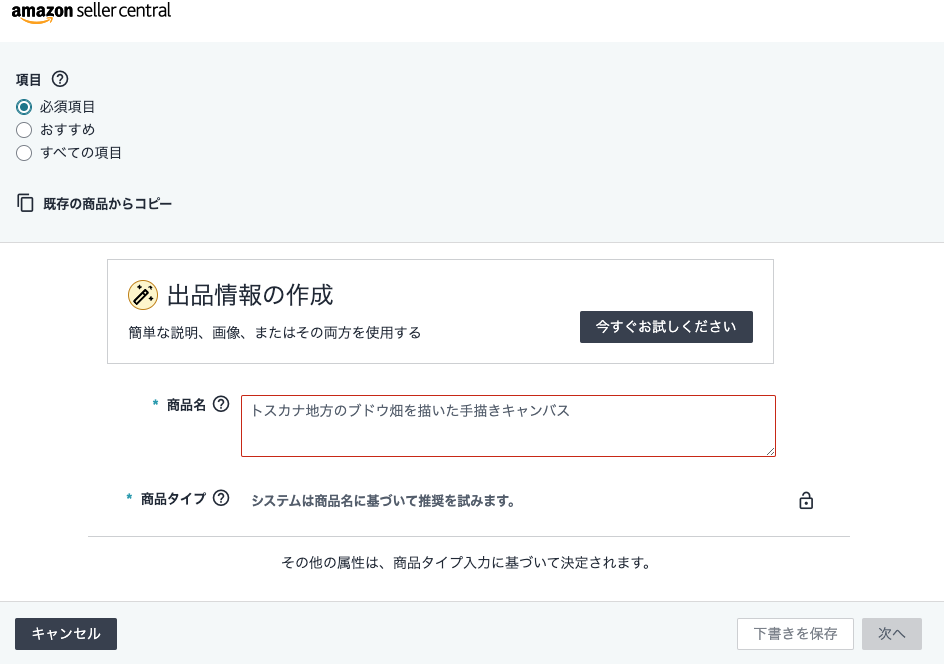
After entering the “Product Name” and “Product Type,” you will proceed to register more detailed product information.
4. Enter the product identification information.
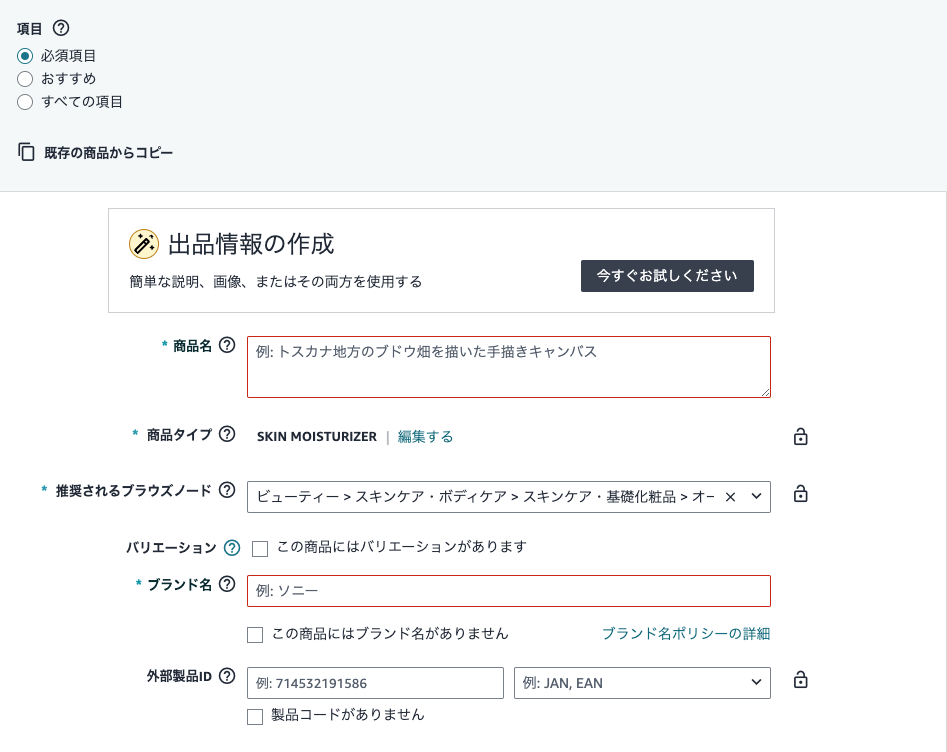
Based on the product information, enter the correct details and then click the "Submit" button.
(※)If there is no brand name, check the box labeled "This product has no brand name."
5. Enter the product description and listing information.
Once you've entered the "Product Identification Information," the following will appear in the tab above.
(1) Explanation
(2) Product Details
(3) Listing Information
(4) Safety and Compliance
I'll explain them one by one.
(1) Explanation
You will set up product images and enter product descriptions and specifications.
In particular, the product descriptionsThese are important factors related to Amazon SEO.
If you'd like to learn more about SEO, please refer to the article below.
As I mentioned earlier, there are guidelines regarding images, so please create them in accordance with those rules.
▼If you'd like to learn more about the images, please check out this article.
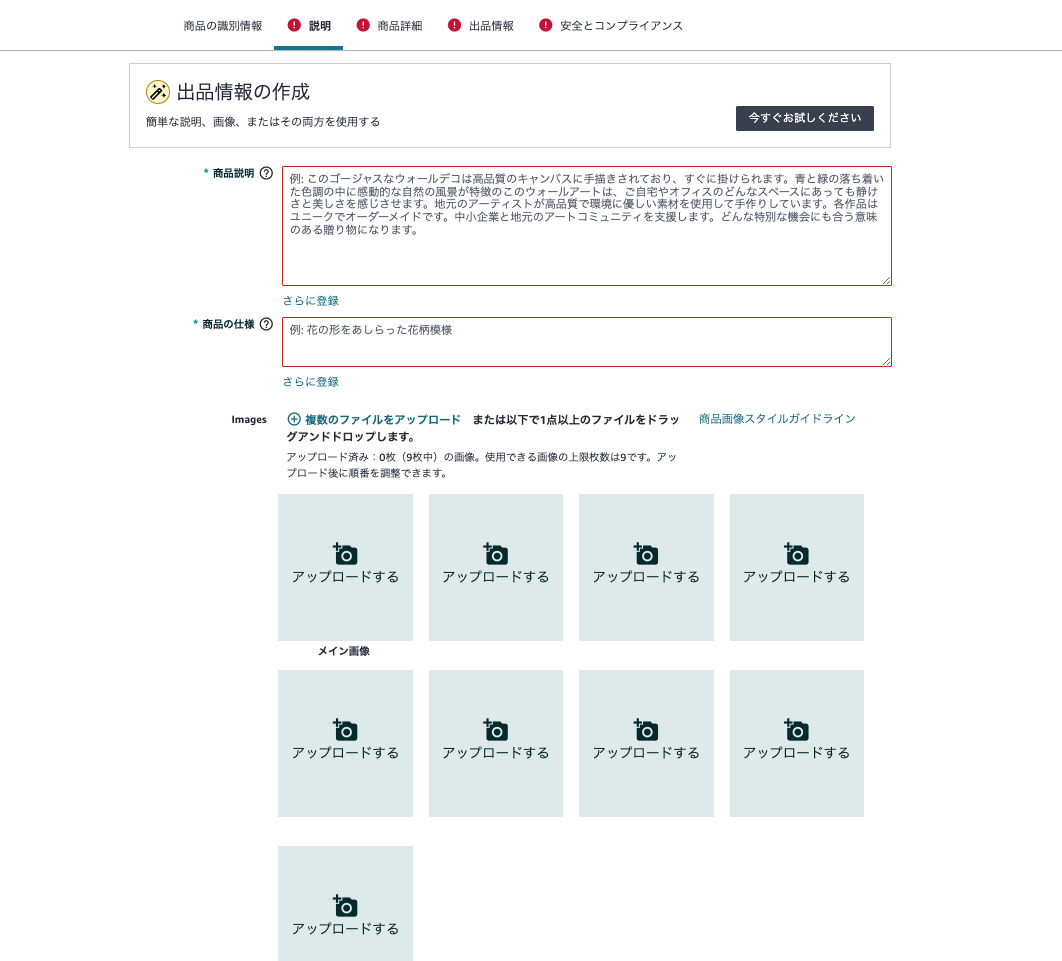
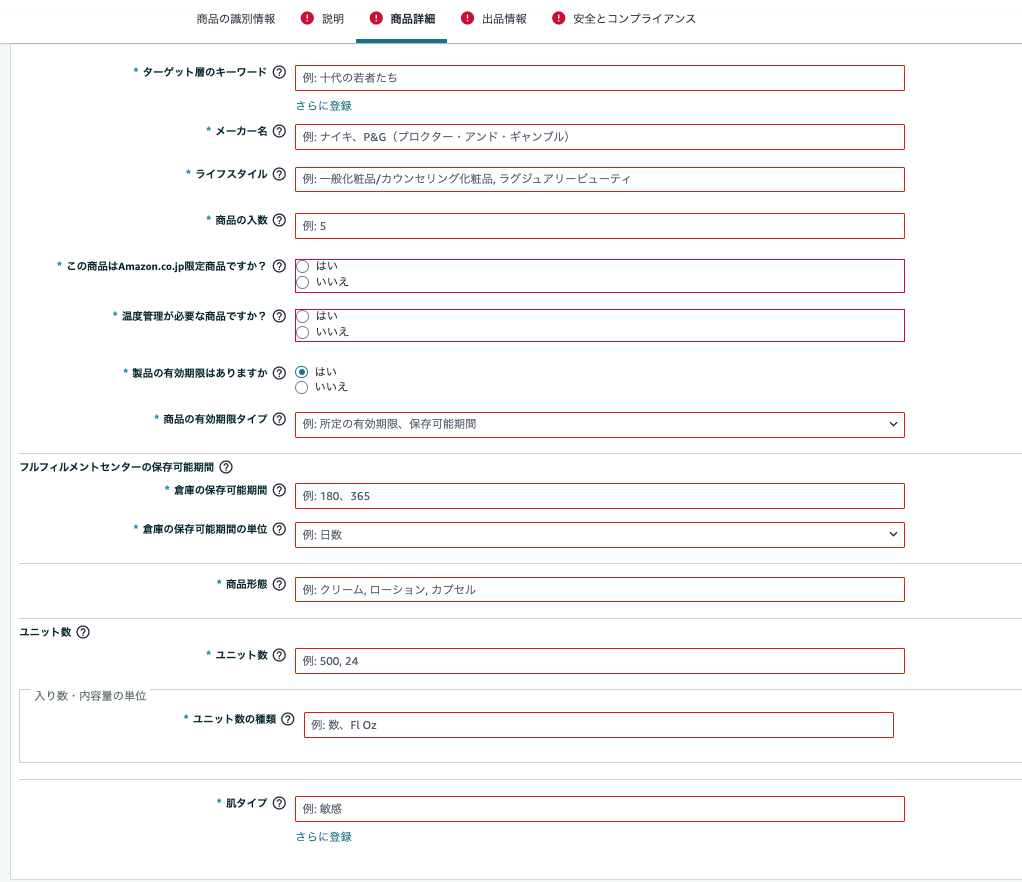
(2) Product Details
Enter detailed information related to the product, such as the target audience and lifestyle.
For products with an expiration date or shelf life, please list them in this section.
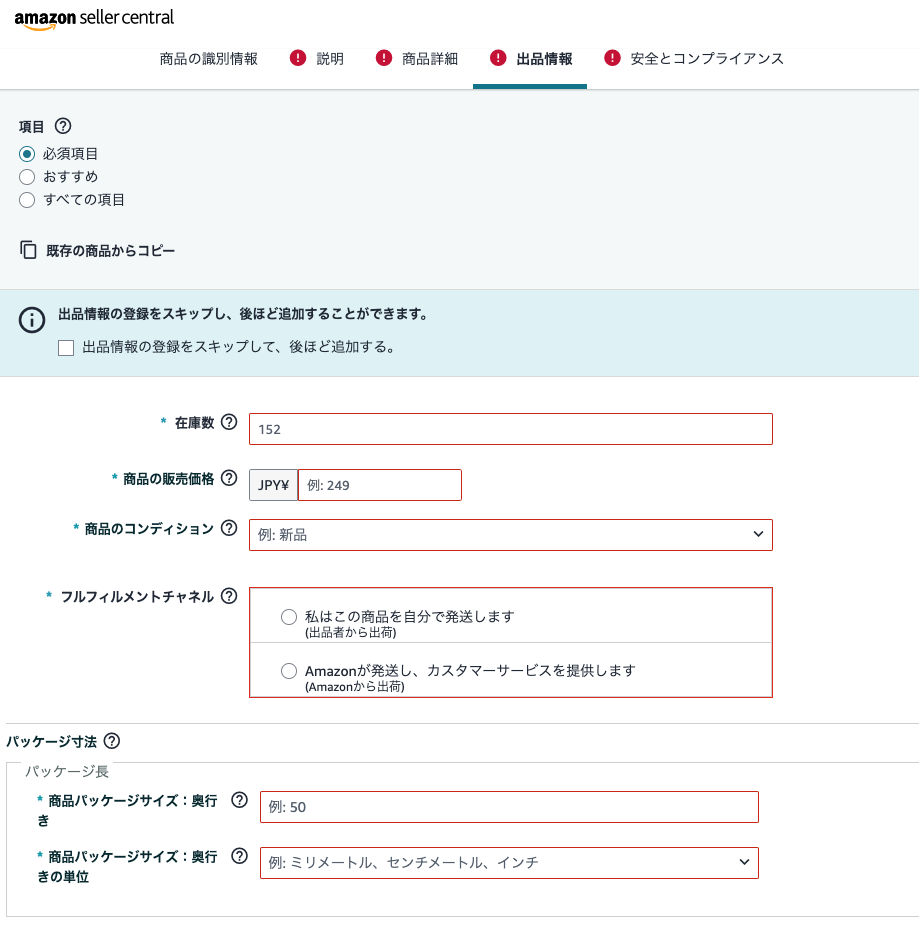
(3) Listing Information
Enter the product price and shipping method (“FBA” or “Ship from Our Warehouse”).
Since size and weight are required fields, be sure to enter them.
(4) Safety and Compliance
Please enter any safety information you would like to convey to users regarding the product here.
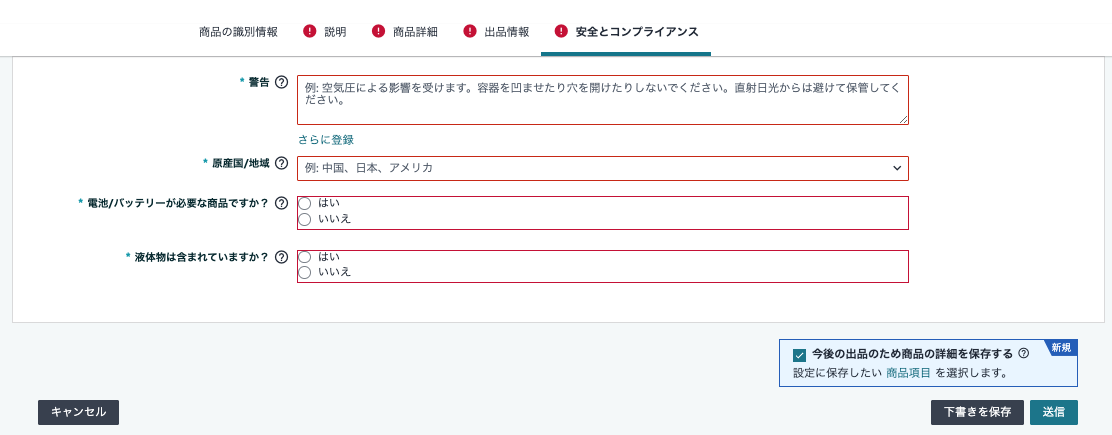
Once you've finished registering, click the button in the lower right corner[Save and Exit]Enter the following.
────────────────────────
These are the fields you need to fill out when registering a product.
After you register,Within 15 minuteswill be reflected and published on Amazon.
However, depending on the product, it may take some time for the changes to take effect.
Up to about 24 hoursPlease be aware that this may happen.
Once we've confirmed that it has been properly published on the Amazon page,Let's enter the product inventory.
Once you've confirmed that the item is in stock, the product registration is complete.
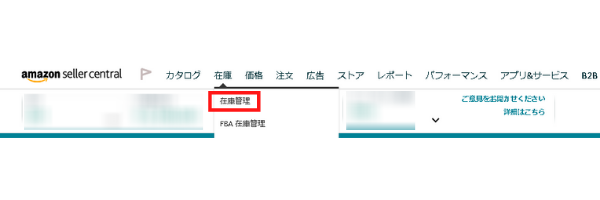
Registered products appear in Seller Central's
[Inventory] → [Inventory Management]You can view it here.
Summary

That's all there is to listing items on Amazon!
First, decide whether you want to list your items as a “high-volume seller” or a “low-volume seller.”
Next, you'll need to register a buyer account and a seller account.
Once you've created an account, you can start listing products.
Please note that the registration process and required materials differ between listing as a co-seller and creating a new listing, so please check these details in advance.
Also, there are a few things you’ll need to prepare for this, so let’s get them ready beforehand.
Check to see if the information you entered has been applied, andOnce you enter the inventory, the product registration is complete.
Once you get the hang of it, anyone can easily sign up.
Be sure to try listing your items while reading this blog!
By the way, I’ve summarized how to open a store on Rakuten in the following article.
If you're interested, please be sure to check it out.
Hide&Seek, the author of this blog, is,
We are a Fukuoka-based company that provides management services for Amazon, Rakuten, and Yahoo!.
"I want to open a store on an e-commerce marketplace, but I don't have the resources to spare."
"We want to expand our sales channels while maintaining the competitive edge of our own online mall."
"I opened a store on an e-commerce marketplace, but I'm too busy to manage it properly, so my sales aren't going up."
If you're facing such concerns,
Please feel free to contact us using the link to the contact form below.


アイキャッチnew.jpg)