


It’s been over a year since GA4 was launched, hasn’t it? However, I imagine there are still many people who haven’t implemented it yet and don’t know how to use it.
So, first, I’ll explain how to set up GA4.
*Note: This guide explains how to set up GTM. If you’re using a shopping cart or CMS that doesn’t support GTM, please refer to the tag setup instructions for your specific tool.
Basic Steps for Implementing GA4
To set up GA4, you need to follow three steps: (1) Create an account, (2) Embed the GA4 tag in GTM, and (3) Configure the various settings.
① Creating Three Accounts: Google, GTM, and GA4
First, create three accounts: Google, GTM, and GA4.
*If you’re already using UA, the setup process is slightly different, so we’ll cover that in a separate article. If you’re using UA but aren’t using GTM, please read only the section on GTM.
① Creating a Google Account
*If you already have a Google Account, please skip this step!
First, create a Google account.
You cannot create a GTM account or a GA4 account without a Google Account.
If you don't have a Google Account for work (such as an account to use for a site where you want to implement GA4), now is the time to create one.
https://accounts.google.com/signup/v2/webcreateaccount?hl=ja
You can create an account using the link above.
② Creating a GTM Account and Installing Tags
*If you already have a GTM account, please skip this section!
Next, set up a GTM account.
GTM (Google Tag Manager) is a tool that allows you to centrally manage tags used for web analytics.That's it.
Those who work in advertising may already know this, but since those who are new to website management probably don’t, I’ll explain it briefly.
*If you're already familiar with GTM, feel free to skip this section!
When analyzing a website or implementing tools, you can perform analyses or use the tools by embedding code—known as “tags”—into the website’s HTML.
However, embedding all the tags within the same HTML file to use numerous analytics and measurement tools can cause the site to load slowly.
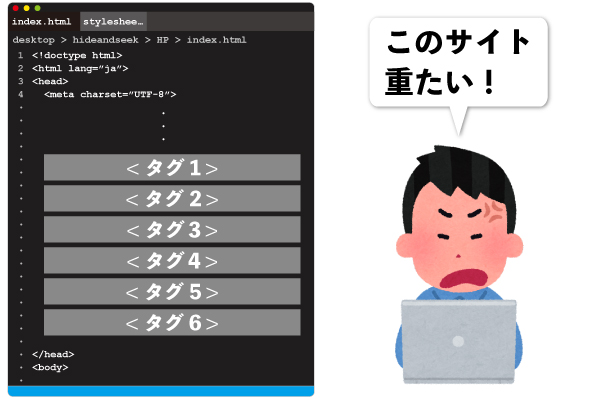
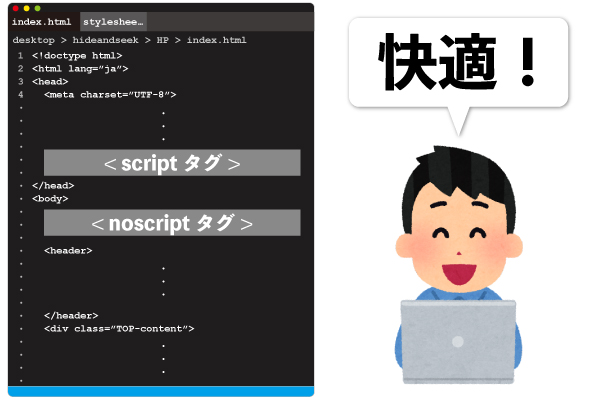
GTM can solve this problem. Specifically, there will be only two tags to embed on your website: the GTM script tag and the noscript tag.
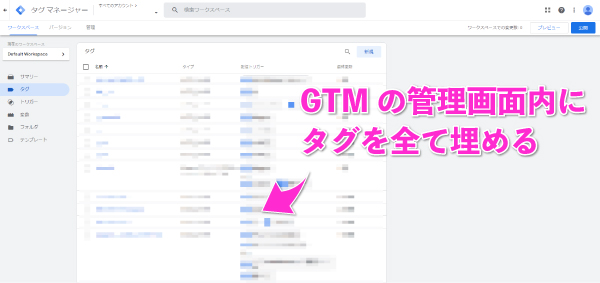
Since all tracking tags and tags for implementing tools are embedded within the GTM admin interface, there’s no need to manually insert them into the HTML.
That's enough explanation for now—let's go ahead and create a GTM account.
<設定方法>
First of all,GTM Official WebsiteGo to [link] and click "Use for Free"

Enter a name for your account—such as your company name or website name—that you will easily recognize, and select "Japan" as your country.
In the "Container Name" field, enter the site name or, if you want to organize tags by genre within the site, enter the genre name. In the "Target Platform" field, select the option that applies to you, then click "Create."
*Note: GA4 does not currently support AMP.
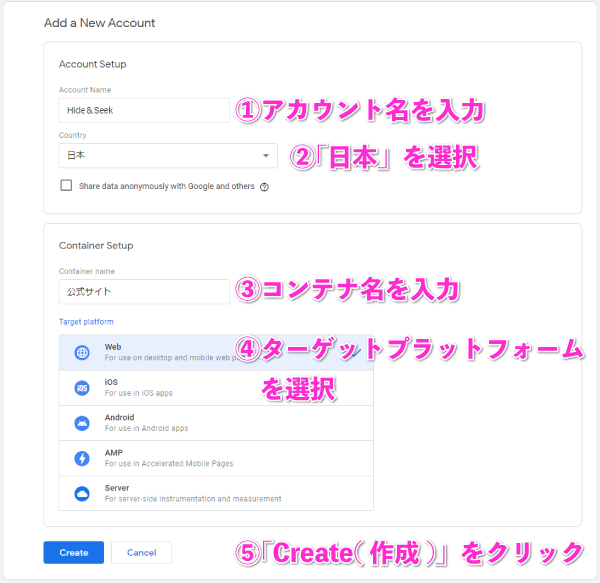
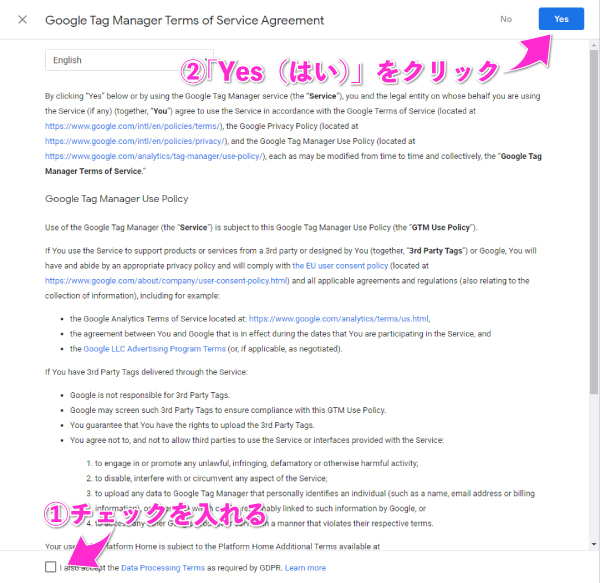
The Terms of Service will then appear. Check the box labeled “I also agree to the data processing terms required by the GDPR” at the bottom of the image, then click “Yes” in the upper-right corner of the image to create your account.
Since the Terms of Use are not yet available in Japanese, please proceed using the English version.
The tag below will then be displayed; embed it within the HTML of the website you want to track.
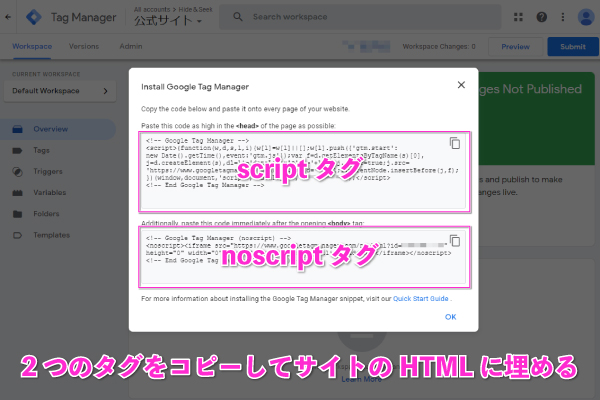
*The script tag is</head>Just before the tag, the noscript tag is<body>Please place it immediately after the tag.
That completes the GTM setup.
③ Creating a GA4 Account and Property
Finally, let's create a GA4 account.
<設定方法>
First of all,GA4 Official WebsiteGo to the page and click “Use for Free.”

If you're already signed in to your Google Account in Chrome, the screen below will appear; however, if you're not signed in yet, the sign-in screen will appear, so please sign in.
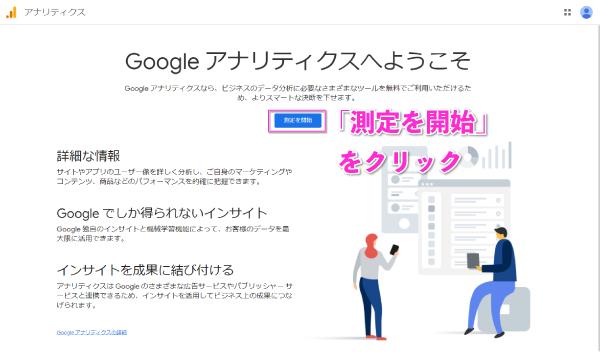
If you were not logged in, the page below will open after you log in, so click "Start Measurement."
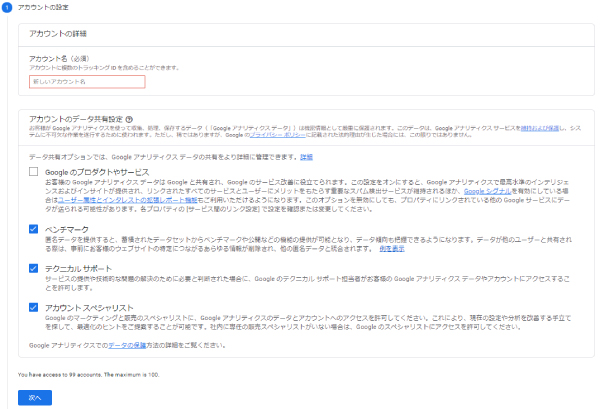
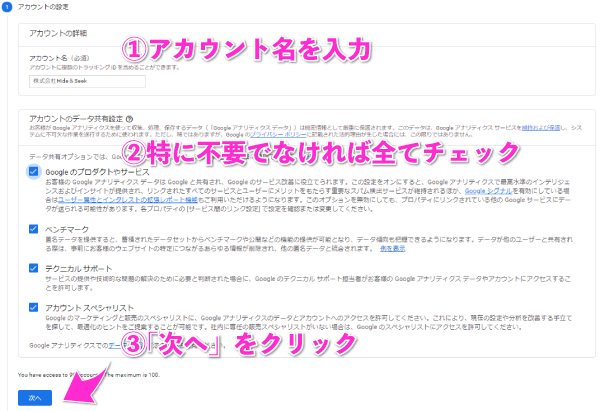
Enter an account name that’s easy for you to remember, such as your website or company name. Read the guidelines in the checkboxes, and if there are no issues, check all the boxes and click “Next.”
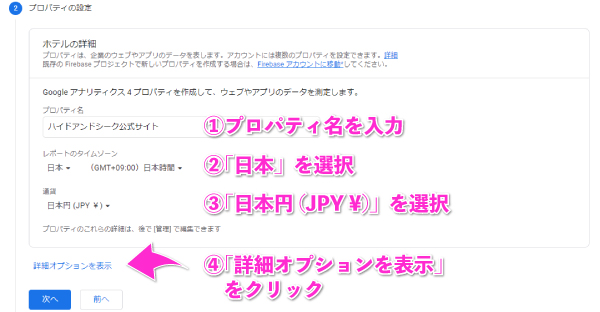
Enter a property name. Choose a name that’s easy to understand, such as the site name or service name.
Then, set the report's time zone to "Japan" and the currency to "Japanese Yen," and click "Show Advanced Options" in the lower-left corner.
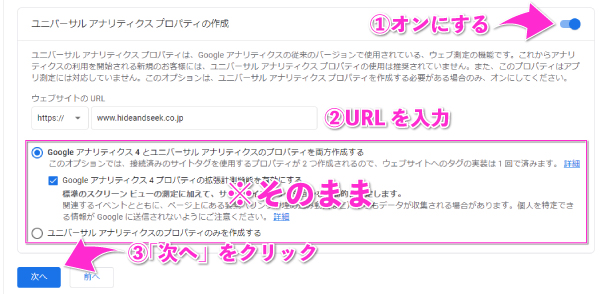
Check the box to the right of "Create a Universal Analytics property," enter your website's URL, and then click "Next."
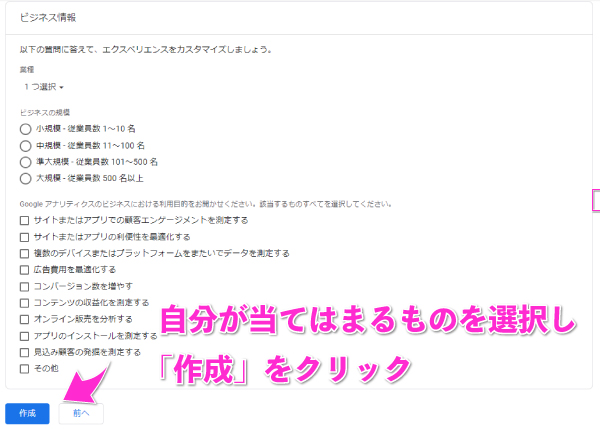
Select the option that applies to you here, then click "Create."
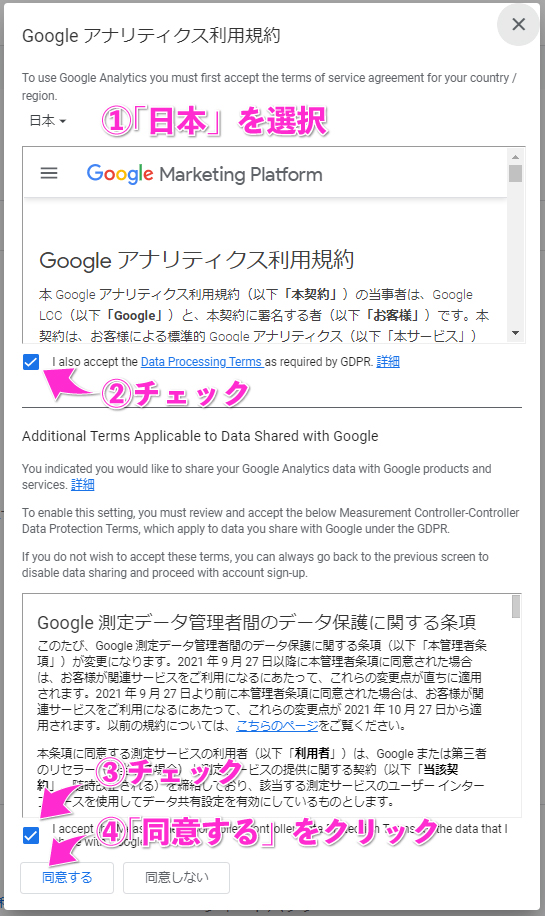
When the Terms of Service appear, select "Japan," check the two boxes, and click "I Agree."
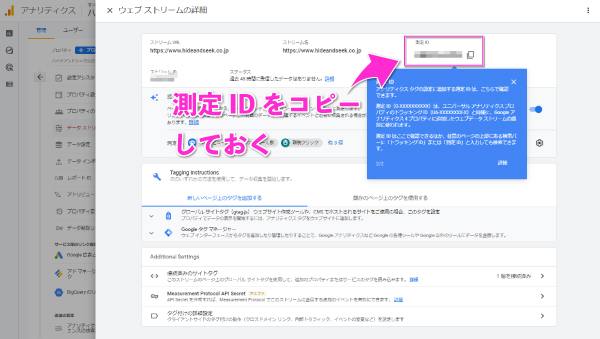
Once you're taken to the screen below, the creation process is complete, but,Before closing the window, let's copy the measurement ID.
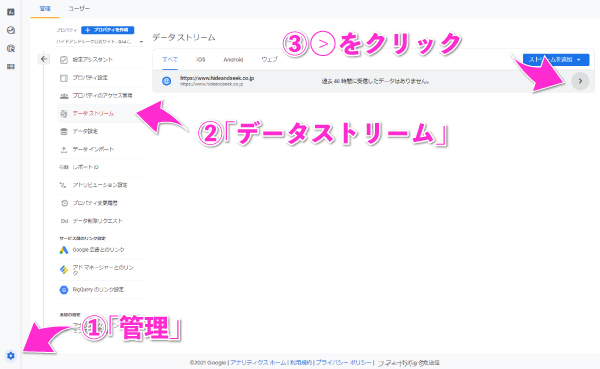
If you accidentally close the window, click “Manage” in the lower-left corner, then “Data Stream,” and then the “>” icon next to the data stream you just created to return to the original screen.
↓Reference Image
② Add the GA4 tag to GTM
<設定方法>
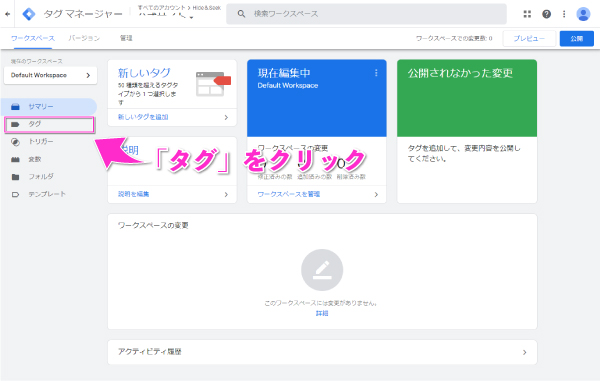
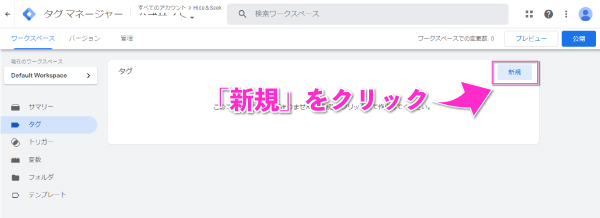
First, open the GTM admin interface, then go to the "Tags" section under the Workspace tab.
Next, click "New"
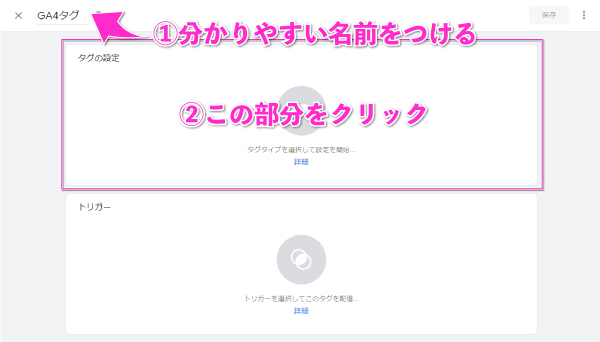
Give the tag a clear name, such as "GA4 Tag," and click the "Tag Settings" section.
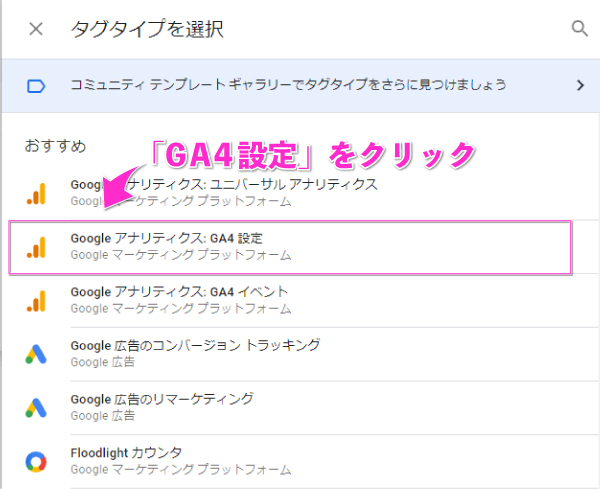
The tag types will then be displayed; select the "Google Analytics: GA4 Setup" tag from the recommendations.
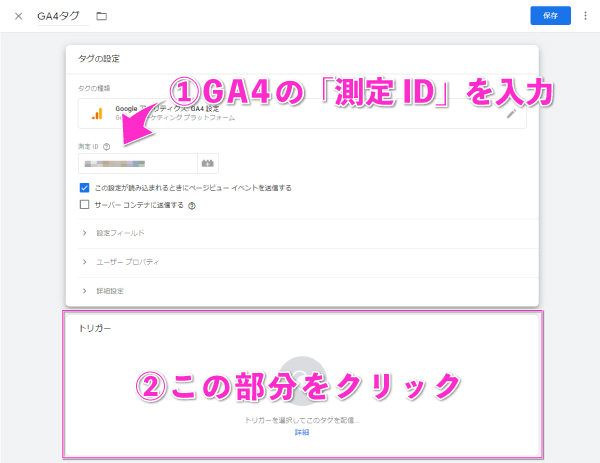
Next, enter the tracking ID displayed on the screen after creating your GA4 account, and click the “Triggers” section.
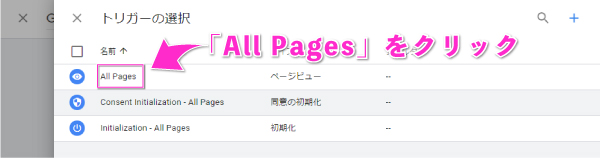
Select “All Pages.”
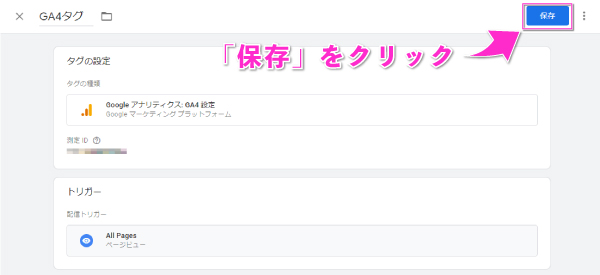
If the content matches the image below, click "Save."
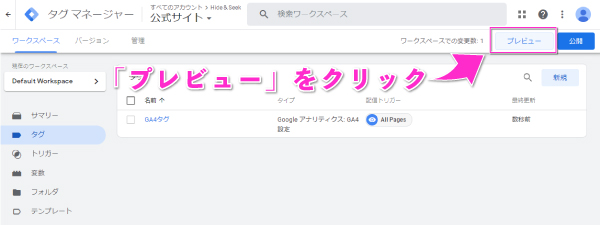
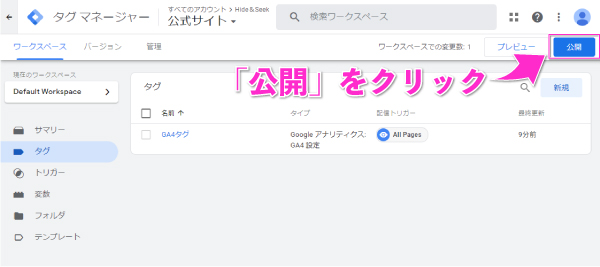
Finally, check to make sure the tags are firing on the site, and then click “Publish.”
Click "Preview" to
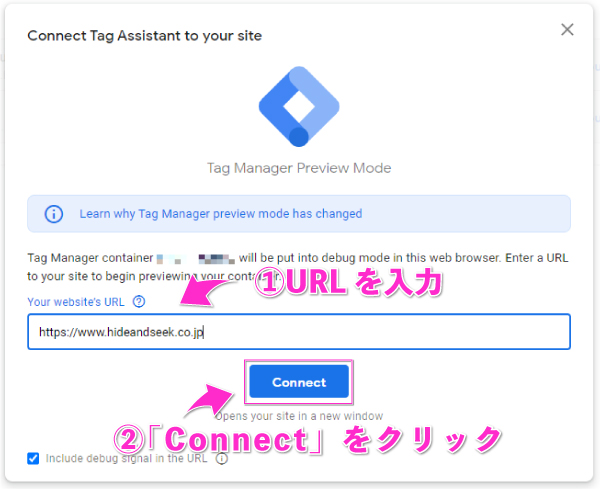
After entering the URL of the site you want to add, click "Connect."
If the "GA4 tag (the name you gave it)" you just installed appears under "Tags Fired" in the admin panel, everything is fine. However, if it appears under "Tags Not Fired," the GTM tag may not have been installed correctly on that site, so please check it.
*By the way, whenever you implement a tag in GTM, we recommend that you always check to make sure the tag has been implemented correctly using the Preview feature or Developer Tools.
Once you've confirmed that tags have been added to "Fired," return to this screen and click "Publish."
In GTM, you can assign a name and description to each "version" to make it easier to manage tags effectively. For this example, let's name this version "GA4 Basic Tag Setup" and publish it.
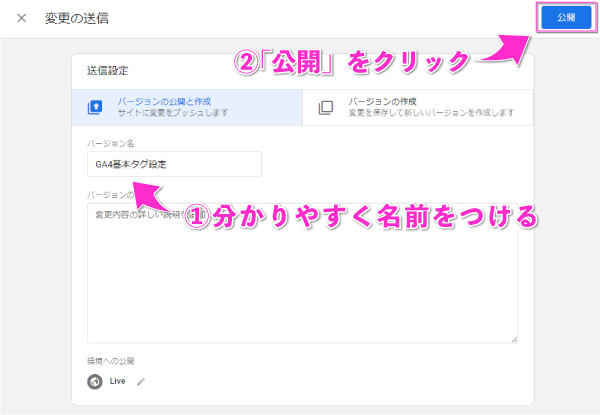
This completes the initial GA4 tag setup in GTM.
③ Other Settings You Must Configure
That completes the GA4 setup, but there are still a few more settings you should configure, so I’ll walk you through them.
Set the data retention period to 14 months
First, since the default data retention period is set to “2 months,” let’s change it to the maximum of “14 months.”
<設定方法>
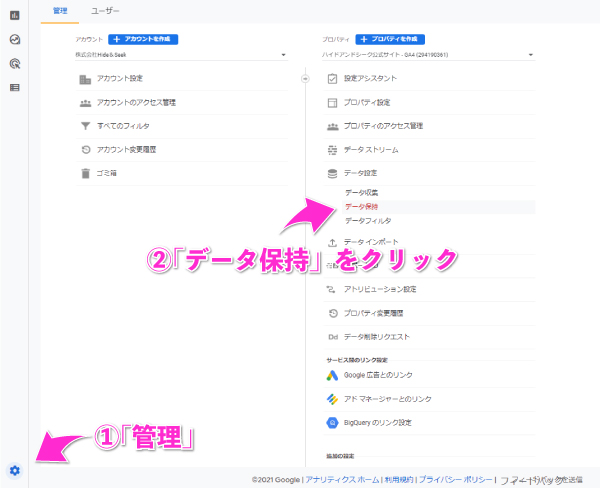
Click "Data Retention" in the Properties pane under "Management" in the lower-left corner
Once you've set the event data retention period to "14 months," click "Save" to finish.
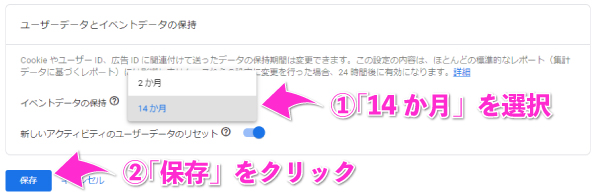
By the way, it takes 24 hours for the data retention period to take effect.
Also, even if you set the retention period to 14 months, it appears that data related to “age,” “gender,” and “interests” is automatically deleted after 2 months.
Delete My IP Address
Next, delete your IP address.
This is to ensure that events such as your own page views are not included in the data when analyzing the site.
<設定方法>
Click "Data Stream" in the Properties pane under "Management" in the lower-left corner
Click "Advanced Tagging Settings" at the bottom of the page
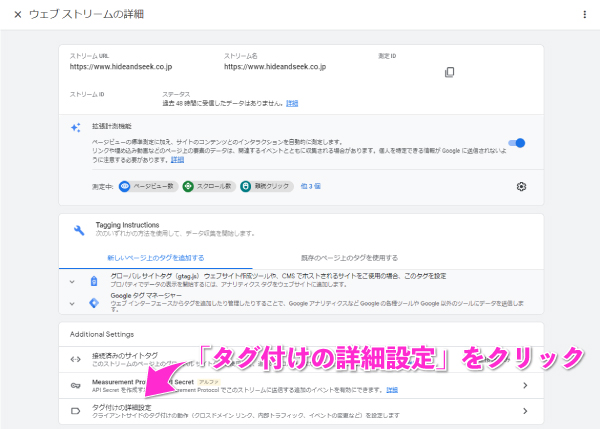
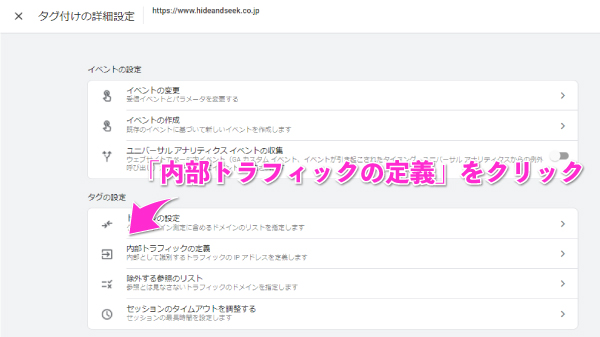
Click “Definition of Internal Traffic”
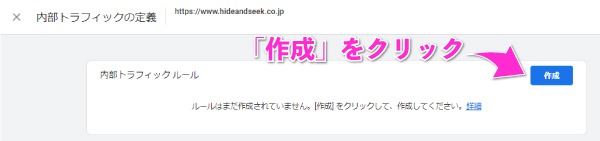
Click "Create"
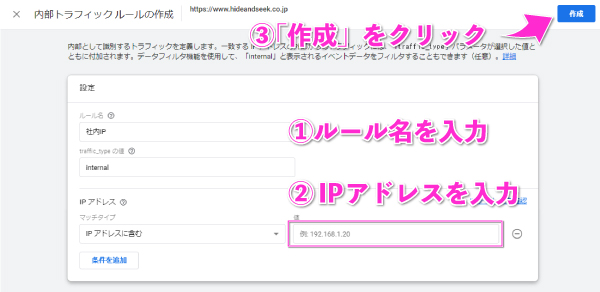
Give the rule a clear name, such as "Internal IP," select "IP address is equal to the following," enter your own or your company's IP address, and then click "Create."
※HereYou can check your computer's IP address here
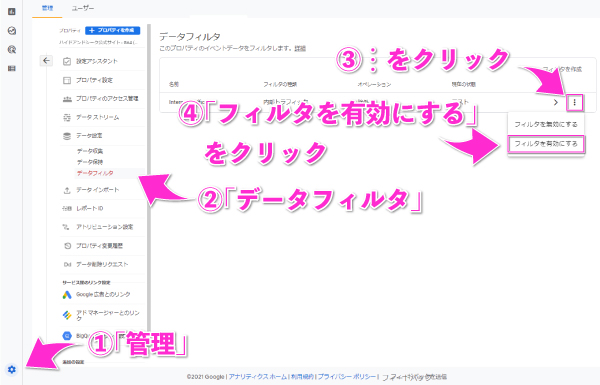
Then, return to the management page, click “Data Filter” in the Properties section, and enable the filter for the internal traffic you just created. That’s it!
Enable Google Signals
Let's enable Google Signals.
Google Signals is a feature that allows you to track users who access your site from different devices or browsers as a single user.
Enabling this feature means that, whereas previously only users who had been assigned a User-ID (users logged in to the site) could be tracked across devices, users logged in to Google can now also be tracked across devices.
<設定方法>
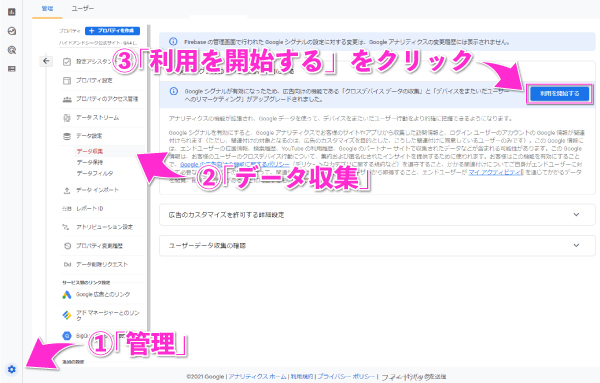
Click "Management" in the lower-left corner, then click "Data Collection" under "Data Settings" in the Properties section, and finally click "Start Using" to complete the process.
Cross-Domain Settings
Finally, let's configure cross-domain settings.
If you only have one domain, you can skip this step.
<設定方法>
Click "Data Stream" in the Properties pane under "Management" in the lower-left corner
Click "Advanced Tagging Settings" below
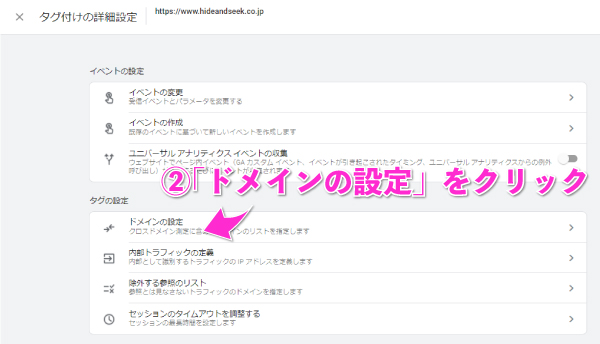
Click "Domain Settings" in the tag settings
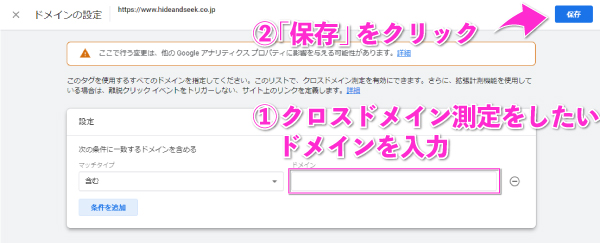
Enter the domains you want to measure across domains, then click "Save" to finish.
That wraps up the GA4 setup for now!
Next, you’ll set up custom conversions based on the metrics you want to include in your reports—I’ll cover that in my next article, along with how to use the reporting features!